Background
|
I have been toying with building my own tube amp for quite
some time now. I did a LOT of research on the Internet and found many good
sites with schematics, parts, and even some kits. One in particular that
interested me was the AX84 amp project.
There is a lot of web support, and many of the amps have actually been built.
In the course of my research, I stumbled upon David Allen's site (his new web
site is www.allenamps.com) and checked
out what he had to offer. He offers four amp models ranging from 7 watts to 80
watts. All of the amps are available in a wide range of speaker configurations
(1x10, 1x12, 2x10, 2x12, 4x8, 4x10, 4x12 - well, you get the picture!) and as
either a combo or head. All Allen Amplification amps are available as a
finished ready-to-play amp or as a kit.
Since all of my playing is strictly hobby and in my house, one of my main
priorities in choosing an amp was low power! I've owned a '68 Fender
Princeton™ amp, and at 12 watts, it was too loud for playing in the house
with the volume 'dimed.' I bought a '74 Fender VibroChamp™ (6 watts),
which was very good for what I wanted. I could crank it up to get the tube
saturation without my ears bleeding.
But, I wanted more flexibility than the VibroChamp offered, and really wanted
to try my hand at actually building an amp. When I read the specifications of
the Allen Class Act, I was intrigued. One of the great features of this amp is
that you can swap out the power tubes without rebiasing to change the sound of
the amp. You can use an EL34, 6L6, or 6V6GT (same as Champ). The power is rated
at 7 watts using the EL34 and 6L6, and 4 watts with a 6V6. The Class Act uses
two 12AX7s in the preamp, uses a solid state rectifier, and has a
Marshall™ plexi-style high-gain input as well as a Fender™ low-gain
input. And you have a volume control for the preamp section and a "master
volume" for the power amp. So, you can crank up the gain on the preamp if
you want it "crunchy!" Ultimate flexibility!
I have some electronics background, and know how to solder and do minor
assembly. But, my big concern when looking at the other amps kits I was
considering building was the actual gathering of all the different parts. While
all of the support documents on the other kits (and on-line experiences of
people that had built the amps) was pretty good, I was still apprehensive about
actually ordering all these parts and putting them together! I even work at a
precision metal fab shop, so making the chassis wasn't a big deal - but the
layout, wiring, and component selection was just a little overwhelming. I
didn't want to make a career out of building an amp! I also started pricing out
the components (transformers, potentiometers, knobs, capacitors, resistors,
switches, jacks, speakers, cabinet, wiring, etc.) and the price climbed
quickly! If you're an electronics hobbyist, and have many of these components
"laying around" the costs probably aren't as high. But, if you're
starting from scratch, as I was, the component cost does add up! So when I
compared the price of doing it all myself versus the $499 price of David
Allen's Class Act kit (ALL parts included to make an amp [including a
professionally built cabinet & speaker] and designed to work & fit
together and with telephone & email support if I need it), I easily decided
upon going with the Class Act kit.
|
Part One - the electronics
|
Day One
|
Well, I received my Class Act kit on Friday, 5/26/00. When
I ordered, David told me he was out of the cabinets, but I asked him to go
ahead and send me the chassis kit so I could get started on it. I have a 2x12
cabinet that I built a few years ago that I can use to "test" it.
That evening, as I opened the package, I realized that there are a LOT of parts
to this thing! Anxiety began to set in, but then I found "the
package!" In a large plastic zip-lock bag was a parts list, operation
manual, instruction manual for assembly, schematic, and THE FULL COLOR DIAGRAM
(see pic below)! The color diagram shows all components on the eyelet board in
their proper orientation and the wire paths to all hardware. Relief began to
set in. I can do this!
The first thing I did was read the instructions (I know, you're supposed to
just jump in and start soldering but I didn't!). Then I went down the checklist
to make sure everything was there that was supposed to be. So far, so good. I
started mounting the hardware in the chassis. One nice thing about the
instruction manual is that there is a spot to "check off" the items
as you do them. The chassis is made from .090" aluminum, with a PVC cover
on the outside to prevent scratching of the chassis, which you have to peel
off. As I was putting the parts in the chassis, I found that the potentiometer
holes were just a little on the small side, so I redrilled them using a
3/8" drill bit so the pots would slide in easily. I also enlarged the
preamp tube socket mounting holes slightly to make it easier to start the
self-tapping screws. As I was attaching the faceplate but putting all the pots,
jacks, power switch & light, I noticed that one of the pots didn't have a
nut on it. So I emailed David Allen, who said he'd get one in the mail ASAP.
With all the parts in this kit, I was actually pleasantly surprised I wasn't
missing more items!
|
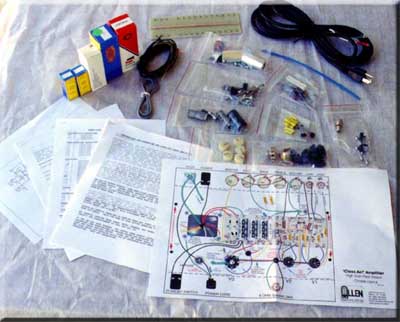 |
Here is a pic (above) of some of the parts that are included in the kit.
As I said, I was anxious to get started, so I took these pics after mounting
some of the hardware!
|
|
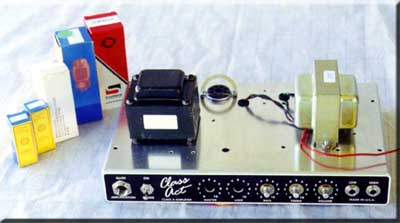
This is a pic of the partially completed chassis. The power transformer and
output transformers are mounted, as are the power light, power switch, standby
switch (rear panel), speaker jack (rear panel), input jacks, and three of the
five potentiometers. The power transformer screws had a lot of varnish on them,
making it difficult to get the nut on. I found another nut in my "nuts
& bolts" bin with the same thread pitch and ran it down all four
screws to clean off some of the gunk. That made the actual assembly go much
easier.
The boxes to the upper left contain the tubes - 12AX7/ECC83 (x2), 6V6GT, EL34,
6L6. After I finish typing this document, I'm off to lay out the components on
the eyelet board, and start soldering!
I'll post more information and pics as the project progresses!
Hey, this IS fun!
|
Day
Two
|
I finished putting in all the chassis hardware. Now on to the
electronics of this project ...
Using the COLOR DIAGRAM (the master document!), I started stuffing the eyelet
board with components. I carefully measured the resistance of each resistor
with my digital volt-ohm-meter to make sure I had the correct one. I
double-checked each component for polarity and location before and after
inserting it! After a couple of hours, I had the board populated correctly. I
dug out my soldering pencil and solder. I freshened the tip of the iron, and
retinned it. My plan of operation was to solder everything on the board that
didn't have any other external wires to it. That way I could handle the board
out of the chassis and trim the leads on the bottom of the board after I
soldered in the components.
Whew, there are a LOT of connections! But, with the way I laid it out, I made
good progress! Once all the "internal" solders were done, I trimmed
off the excess leads from the back of the board, and double checked the board
against the COLOR DIAGRAM. Since I was extra careful when inserting the
components, I didn't have to unsolder and remove any of them!
Now I started cutting up the appropriate colored wires that go from the eyelet
board to the various sockets, jacks, and components. I soldered all of the ones
that didn't involve any other leads from the transformers. Once those were
done, I again trimmed the excess leads. My wire cutters just were too big to
get nice and close to the board, so I decided I would buy some new ones and
finish the project tomorrow.
|
Day
Three
|
Up and over to Sears (where America shops!) to pick up a new set
of miniature cutters. Of course, they don't have just a single pair you can
buy! So I found a nice 5 piece set (bent nose pliers, long nose pliers, needle
nose pliers, diagonal cutter, and end cutting nipper) that was on sale ($20!)
and bought it. Once I was back home, I finished cleaning up the bottom side of
the eyelet board. The end cutting nipper worked great for this!
Next, I moved on to mounting the board (the kit was missing the two mounting
screws, but I had some that worked fine), and soldering all of the
"external" leads from the eyelet board to the various components
(pots, jacks, etc.). This went pretty quickly, since I had already had one end
soldered on the board - I just had to look up on the COLOR DIAGRAM where the
other end went and solder it. I used some of the cloth insulation on the
resistors that get soldered to the input jack and ground, and on the shielding
of the shielded cable.
I now rechecked all my solder joints to make sure they were done correctly. I
found two that needed resoldering - the leads pulled right out! OK, it's done!
Now I referenced the instruction manual, which provided some continuity check
points on the eyelet board. All checked good! I'm starting to get this funny
feeling in my gut.
I cleaned the debris out the chassis left from the wire and insulation
trimming. Next I opened the preamp tube boxes and inserted the two tubes (JJ
Electronic ECC83s) into their sockets - making sure to align them correctly! I
didn't put the shields on yet, well, just in case it doesn't work - the less I
would have to remove to start troubleshooting! I ordered the three different
power tubes (6L6, EL34, & 6V6GT) and pulled the 6L6 out of the box and
inserted it (again, making sure the alignment was correct). I also put a fuse
in the fuseholder, and put the bulb in the power light socket. I got a
5.25" car audio speaker and wired it up as a test speaker (didn't want to
risk blowing a good one!). The anxiety level now is quite high!
Well, I guess it's time to put the juice to this sucker and see what happens! I
was VERY nervous at this point! Should I get the fire extinguisher and have it
ready just in case? I plugged in the Strat and turned up it's volume knob. I
made sure the power and stand-by switches were off, and plugged in the amp's
power cord. Next I set the volume and tone controls to the recommended settings
in the instruction manual (all of what I've described in the paragraph so far
is detailed there!). I flipped the switch ... the purple power indicator lit
up, the tubes started glowing, NO sparks or smoke - hmmmm, this thing just
might actually work! Waited 60 seconds or so, and flipped on the stand-by
switch. Still nothing to call the fire department about! Grabbed the Strat and
struck a chord - I could hear some real tinny notes coming from the tiny
5.25" speaker.
..... IT'S ALIVE!!!
I strummed a few chords and still no sparks or smoke. So, I turned off the amp
and unhooked the tinny little piece of crap speaker and plugged in a 12"
Carvin PA/Bass speaker. I repowered the amp, waited about a minute, flipped the
standby switch on, and WHAM! Real music! I started off using the low-gain input
- 'dimed' the volume (gain) knob and put the master volume on 7. Hey, this
thing sounds pretty darn good! Next, try the high gain input. Quite a bit of
noise with the volume (gain) 'dimed' - backed it off a little, much better!
Move away from the amp, better still! It's surprisingly loud too!
So, this is just a preliminary report of the amp, I've only had it on for an
hour or so. I haven't experimented with changing the tubes yet. I'll wait until
I get the cabinet and speaker, and get the combo finished. But my initial
impressions are VERY GOOD! I can get a wide range of sounds from this amp -
back off the guitar's volume knob, and even the high gain input cleans up. It's
a little "ice-pick trebly" using just the bridge pickup with the high
gain input - but there are some recommendations on how to "tailor"
the sound printed on the schematic. Another huge point for the flexibility
issue! This is going to be a smokin' little amp!
|
|
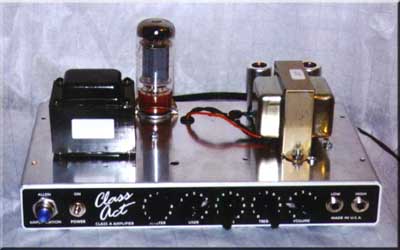
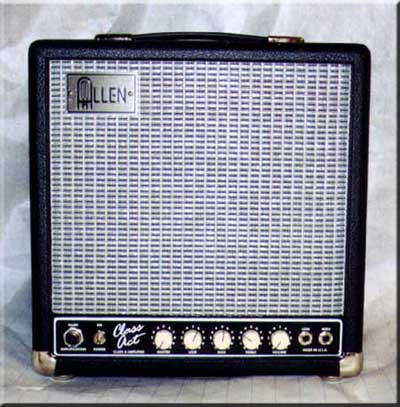
Here is a pic of the complete Class Act chassis! The purple jeweled power light
is actually on, but the camera's flash washed it out. Next to it is the AC
power switch. The knobs (left to right) are: Master Volume, User (Middle),
Bass, Treble, and Volume (preamp gain). The left input jack is the low gain
input, and right jack is the high gain input.
|
|
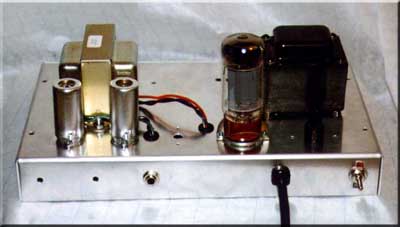
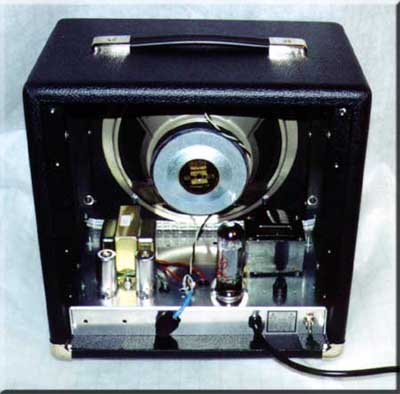
This is a rear view of the Class Act chassis. The two 12AX7 preamp tubes (with
shields installed) are on the left, behind the output transformer. The 6L6
power tube on the right, behind the power transformer. You can also see the
speaker jack in the middle and stand-by switch (far right).
|
|
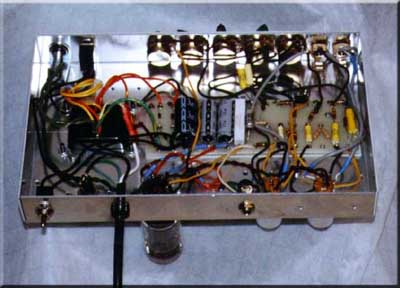
This is what the inside looks like! Just like the COLOR DIAGRAM!!! :)
I'll also take some pics of the cabinet installation and the final product! I
was very relieved that it worked from the first power on! I think if you take
your time and double check EVERYTHING as you go, you will probably have the
same type of experience! This whole experience has motivated me to build a
couple of pedal projects I have been considering for a while now - or heck,
maybe even another amp ... with reverb ...
Later that day ....
I have now spent a couple of hours playing with the amp and trying different
settings. I am AMAZED at the different tones & sounds! On the low gain
input, you can 'dime' the volume (gain) and put the master volume at a
comfortable sound level for a Fenderish clean. But, I discovered you can back
off the volume (gain) knob and crank up the master volume to get a "hard
pushed" tube sound (like a tweed running at 11)! There is the same type of
variety using the high gain input as well! Great crunch!
|
Part Two - the cabinet
|
June 6, 2000:
UPS delivered a package from David Allen! Inside it I found the Class Act
cabinet, Celestion Vintage 10 speaker (already mounted!), speaker wire &
jack, and missing hardware (potentiometer nut & washer). First of all, I
have to comment on the cab - the fit & finish is flawless! There are NO
bubbles or gaps in the Tolex, and the grillcloth is straight and tight! It's an
extremely high-quality item! The cabinet comes with a black strap handle on
top, bottom chrome corner protectors (front & back), four bottom metal
glides, and two rear panels. There is also "stick-on" shielding on
the cabinet where the chassis sits.
I did a final "check over" on the chassis and re-tightened the
transformer nuts as suggested in the instructions. I also checked to make sure
there were no wires over the mounting holes to block the screws from going
through the chassis. I installed the missing potentiometer washer and nut, and
changed the black chicken-head knobs (seen in previous pics) to the vintage
white round knobs. I found that it's easier for me to spin the round knobs, and
easier to see from a distance. David was kind enough to send both types so I
could pick the ones I liked, and return the others. (Have I mentioned what a
nice guy David is? Very knowledgable, and even pleasant!)
The Class Act has a "bottom mount" chassis arrangement, meaning the
chassis is mounted in the bottom of the cabinet rather than in the top. I
removed the two back panels, and connected the speaker wire terminals to the
speaker. I gently slide in the chassis and turned the cabinet on it's side so I
could put the screws in through the bottom of the cabinet. A little jiggling of
the chassis, and the screw was in. I left the screws loose, so I could make
sure the chassis was in the proper position and straight. The front screws were
a bit of a reach to get the nut started, but not too bad. I centered and
positioned the chassis and tightened down the four screws. Next, I plugged the
1/4" speaker plug into the speaker jack on the back of the chassis. I used
a small wire tie through an extra set of holes in the chassis to
"capture" the speaker wire so it couldn't fall against the tubes or
transformers. It doesn't look like it would, but I just wanted to make sure!
The final step was to put the rear panels back on. Again, it's a high-quality,
very professional looking amp!
After putting the back panels on, I fired it up to check out how it sounds.
The Celestion Vintage 10" sounds different than the 12" Carvin
PA/Bass speaker I am used to hearing the amp through. Please note that I didn't
say "worse!" I haven't had much time this evening to play it much,
but will report back when I've had a chance to play it more.
I haven't felt a need to use my overdrive pedals with this amp. I have used a
FullDrive 2 (FM model) to provide the bit of "volume boost" from time
to time, but can do the same thing by cranking the amp up a little more, and
backing down on the guitar's volume for the rhythm, and just turning up the
guitar for the louder passages.
So, with some sadness, this brings my project to a close - after getting the
chassis into the cabinet, it felt "done." The Class Act amp looks
great, and sounds fantastic to me! It's just what I was looking for - a
low-powered, very flexible, great sounding tube amp that I got to put together
myself!
My thanks to David Allen for providing a "one-source,"
high-quality amp kit experience!
|
Part Three - living with it
|
June 13, 2000:
I've had the amp in a completed state now for a week or so and I still really
like it! Here's the day to day stuff I'm sure many of you are interested in -
the nuances of the amp!
The amp has plenty of power for me and is quite loud! I certainly don't think
you could compete with a drummer without the help of a PA system! My wife does
ask me to turn it down on a regular basis, but I can just dial in the
tone/drive I want at almost any volume!
I've had a chance to try the different tubes in it. The tube compliment I've
used is: 6L6 (Svetlana), EL34 (JJ Electronic), & 6V6GT (JAN). I didn't
notice a huge difference between the tubes, but I've found that I like the 6L6
the best so far (seems to be the "smoothest" overall). I haven't
tried any other brands, which I know can make a difference too. With the EL34,
the amp seems to be brighter, and somewhat harsh in the high end. I haven't
tried adjusting (replacing) any of the electronic components yet.
I can hear a slight transformer hum (not through the speaker nor does it vary
by adjusting the volume knobs) when the amp is powered on. I don't notice it AT
ALL when playing - at any volume level. And, I'm still trying to get used to
checking the stand-by switch BEFORE turning the power on! It would be easier to
check if it were on the front panel, but there just isn't enough room in this
chassis for it there.
The high gain channel can go from mild to VERY, VERY overdriven! I am thinking
of trying a 12AU7 in one of the preamp stages just to see how that combination
sounds (remember the flexibility thing from above?). You can totally dial in
the amount of overdrive you want (preamp or power tube). I don't use any
overdrive or distortion pedals at all now with this amp (not even my
FullDrive 2, which I sold!). So, I guess my "overdrive tone
quest" has officially ended! :)
The Class Act is a little noisy at idle (as most Class A type amps are), but
again, not objectionable. I get some noise between it and my Strat (stock
pickups) when the two are very close together (12"-18" or closer, and
while not playing - I notice it when I'm bending over to change an amp setting
without turning down the guitar volume knob) - but I also get noise through my
Strat when I'm close to my computer (general RFI). My other amps do this also,
so it's certainly not a trait limited to the Class Act.
Speaker - the Celestion Vintage 10 (offered as an "upgrade" speaker
in the Allen Amps kit package) is pretty good. I got used to listening to the
Class Act through a Carvin 12" PA/Bass speaker the first few days, so the
Vintage 10 just doesn't have the extra low range that a 12" has. But, it
is a very balanced, nice sounding speaker. I would still like to try a Weber
C10NQ in it just to see how it sounds [hey Ted, how about a "loaner?"
:) ]. And there are a few other combos I'd like to try with various speaker
brands - 2x12" or maybe a 4x10". So many speakers, so little time.
Bad things about the Class Act kit - well, I wish I had done it sooner! I still
prefer the convenience of "top mount" style of combo amps - I don't
put the Class Act directly on the floor because it's too far of a reach for the
controls. It has been residing on a table, but I plan on buying an amp/speaker
stand to keep it on.
|
June 18, 2000:
Today I altered the Class Act circuit board (removed a capacitor) to help
"smooth out" the treble. The "harshness" in the treble
(especially with the bridge pickup) is now not quite as piercing - but it was a
very subtle change. An advantage of the "point to point" wiring -
easy to make changes! It actually took longer to get the chassis out of the
cabinet than it did to make the mod.
|
June 23, 2000:
I received two different preamp tubes from David Allen to try out - a JJ
Electronic ECC82 and a 12AU7A (I'm currently using JJ Electronic ECC83s in the
both preamp stages). I started with the 12AU7A in the second position preamp
stage (ECC83 in first stage). The low gain channel was anemic and had some
strange aftertones. I tried the high gain channel, and it didn't have the weird
aftertones, but the overall volume level was substantially lower and didn't
want to overdrive unless the preamp volume was max'ed. I moved the 12AU7A to
the first position preamp stage and put my original ECC83 back in the second
stage. I started off using the high gain channel - WHAT HAPPENED? My Class Act
has been neutered! With the ECC83, I'd run the preamp volume between 3
and 5 to get a nice overdriven sound. With this 12AU7A, I had to crank the
preamp volume to 7 before getting any overdriven tone. Way TOO wimpy! Tried the
low gain channel - you really have to crank it (both preamp & master
volumes) up to get the same volume level (and to get to that overdriven point).
I tried the same thing with the ECC82 tube in the first preamp stage only
(ECC83 still in the second stage), with the same results. Both the ECC82 and
12AU7A have a very controlled, clean tone, and are hesitant to break up until
pushed at the higher range of the volume control. Would be great for someone
looking for a clean tone, with just a little overdrive at higher volume levels.
But NOT for me!! I want that blistering, in-your-face, fully cranked sound! So
I shut down the amp, and put the original ECC83 back in the first preamp stage.
Powered up the amp and AHHHHH - the balls are back! I didn't
bother to put the ECC32 and 12AU7A in both stages at the same time - I figured
it would be even wimpier than just using one of them.
So, if you want a clean, lower output with mildly overdriven sound at higher
levels, pick up a 12AU7A or ECC82. If you want the ballsy "baby
plexi" - keep the 12AX7s or ECC83s!!
|
June 29, 2000
Well, I couldn't stand wondering any longer, and ordered a Weber C10NQ speaker
(see all of Weber's models at: http://www.webervst.com/)! The C10NQ is one
of Weber's hybrid models. To quote Ted Weber regarding the C10NQ, "Big low
end, smooth, clear highs. Crunchy but not harsh at breakup. The NQ has very
good bottom and the bigger voice coil takes some of the high end out of it from
what you get with a standard Q. It is better balanced and will handle more
power." And that sounds like just what I'm looking for!
I must also compliment the person taking my order (sorry I don't know her
name!). Very professional, courteous and efficient! She asked all the questions
required to get the correct model of speaker ordered, and verified ALL
information (including billing & shipping info) before ending our
conversation. I felt very confident that the right speaker would be showing up
at my door! (which it did, see below.)
|
July 11, 2000
Today I received the Weber C10NQ speaker! I decided against my A/B switchbox
plan after talking with David Allen (the output transformers need a constant
load on them). So I dropped the front baffle board out of the Class Act amp,
removed the Celestion Vintage 10, and installed the Weber C10NQ in the cabinet.
The C10NQ is physically 'deeper' than the Vintage 10, making the rear of the
speaker magnet closer to the power tube (about 1/4" clearance between the
magnet & tube). The basket also clears the power and output transformers
with no problem.
Construction: The C10NQ seems to be very well made! The 'hot dog' basket
is a beefy, full surround affair and louvered, rather than the large cut-outs
other speakers have. The positive terminal is clearly marked with a red dot so
it's easy to keep the correct polarity on the speaker jack wiring. The Weber
logo sticker isn't installed on the speaker magnet, but is included (I chose to
put it on). Also included is an installation guide, warranty sheet (30-day
warranty against defects), and warning notice (about NOT pushing on the cone to
'test' it!).
Sound: My initial impressions are very good! The C10NQ seems to have a
better low end, and the highs aren't as shrill and piercing as the Vintage 10.
Mids seem very good as well - a nicely balanced speaker! I'm not putting
full-power to it until it gets a few more hours on it just as a safety
precaution (self imposed). I will run the C10NQ for a few days to "break
it in" and then rig up some type of A/B test to get a better overall
direct comparison of the two speakers.
So, stay tuned!
|
| August 17, 2000
I finally got my external speaker cab built and did some A/B'ing of the Weber
C10NQ and Celestion Vintage 10. First, I must say that both speakers are
excellent, but different. The Weber C10NQ has a better (lower) bass response,
and smoother high end. The break-up is smoother also. The Vintage 10 is very
well-balanced, and has the British chimey high end associated with the
Celestion line. I personally prefer the C10NQ, and will keep that one in my
Class Act.
|
August 31, 2000
While I was making my external speaker cabinet (which will also be used with a
Randall head), I built two baffle boards (one for a 10" speaker and one
for a 12" speaker) so I can use either size in the cab. I've bought a
Weber C12Q speaker which I'm looking forward to trying with the Class Act! So
when it arrives, I'll post my impressions of it.
|
September 2, 2000
The C12Q finally arrived in today's mail. I quickly installed it in my external
speaker cab, and plugged it into the Class Act. Well, it's another great
sounding speaker from the Weber crew! (do they make any bad sounding
speakers? And NO, I'm not on the Weber payroll!)
I did some A/B'ing between the C12Q and the C10NQ running through the Class Act
and also did a comparison using a Randall 25 watt solid-state head. The C12Q
seems to be fuller, slightly brighter, and have more 'presence' than the C10NQ
- it sounds 'bigger' (which, of course, it is!). Both are excellent sounding
speakers to my ears, and I don't think anyone could go wrong with either of
them. Of course, the size of your cabinet will be the determining factor as to
which one will fit (10" or 12").
Hmmmm ... let's see, I could get a Class Act head cabinet from Allen Amps for a
more compact amp and just run the C12Q external cab full time ... or the Allen
Amps Accomplice combo model has a 12" cabinet, and REVERB!! Decisions,
decisions ...
March 15, 2001
I decided to build another amp, this time based upon the Fender 5E1 Tweed Champ
circuit. Click here for details!
|
|
January 2007
My, how time flies! I ended up selling my Class Act to get something with reverb, and ended
up getting an Allen Amps Old Flame. It is a very nice amp, with a wide range of tones. But at 25 watts
(with 6V6s), it was just more amp than I needed at home. So I ended up selling it also. I also had the
"itch" to build a new amp, so bought an Allen Amps V-18 kit, which is based on the Princeton Reverb
circuit. I documented by build here: V-18 Build Page.
|